Why and How to Sharpen Blender Blades at Home?

Time:2026-10-02 Author:Oliver
0%

A dull blender blade can leave carrot fibers, basil leaves, or ice chunks spinning without breaking down. It may also make the motor sound strained. Learning How to sharpen blender blades at home can restore cutting performance, but it requires patience and realistic expectations. Many household blender blades are stamped from thin stainless steel. They are not always designed for repeated sharpening. In some cases, replacement is safer and more economical.

Appliance-repair educator Steve Ash offers a practical warning: “A sharp blade cannot compensate for a damaged blade assembly.” That advice matters. A bent edge, loose hub, cracked seal, or deep rust can create a serious failure risk. This guide focuses on inspection, controlled sharpening, cleaning, and careful reassembly. It also explains when stopping is the smarter choice.

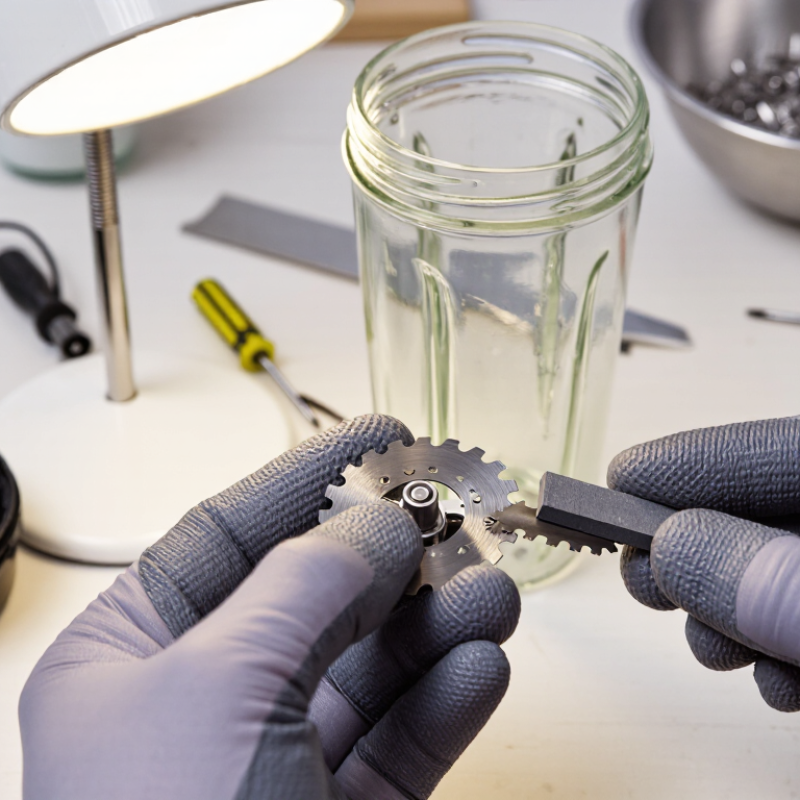
Picture the process clearly. You unplug the blender, remove the jar, and examine the blade under bright light. A fine sharpening stone may touch only the beveled cutting edge. The rounded back should remain unchanged. Metal filings must stay away from food-contact surfaces. Gloves help, but they do not make the blade harmless. I admit that home sharpening is not perfectly consistent. The first attempt may produce a usable edge, not a factory finish. That imperfection deserves attention, not denial. With measured pressure, short strokes, and a final leak check, this task can become safer and more predictable.
Why and How to Sharpen Blender Blades at Home?

Why Blender Blades Become Dull and When Sharpening Is Necessary

Blender blades become dull through repeated contact with hard ingredients, ice, seeds, and fibrous vegetables. Mineral deposits from water can also leave a rough, dull surface. Running the blender empty creates heat and unnecessary friction. Misaligned blades or loose bearings may cause uneven cutting, even when the edge looks sharp. I once blamed a dull blade for chunky smoothies, but the real problem was a worn seal.

Sharpening becomes necessary when blending takes longer, textures remain uneven, or the motor sounds strained. Inspect the edge under bright light. Small nicks, rounded edges, and visible rust suggest maintenance may be needed. However, sharpening is not always the best solution. Thin, stamped, or badly damaged blades are often safer to replace. Follow the appliance’s service instructions, because some blade assemblies are not designed for home repair.

Tips: Disconnect the power and remove the blade assembly before working. Wear cut-resistant gloves and secure the part on a stable surface. Use a fine diamond file or sharpening stone with light, consistent strokes along the original bevel. Do not change the blade angle. A few controlled passes are better than aggressive grinding. Clean and dry the blade completely, then test it with soft fruit, never with your fingers. If the blade wobbles, the bearing feels rough, or the seal leaks, stop sharpening and seek qualified repair advice. My own mistake was focusing on the edge while ignoring the loose base.

Tools and Safety Measures for Sharpening Blender Blades

Sharpening blender blades at home requires control, not force. Unplug the blender and remove the jar before touching the blade assembly. Follow the appliance manual, because some blades are not designed to separate safely. Wear cut-resistant gloves, safety glasses, and closed shoes. Keep a thick towel under the jar to prevent sliding.

Use a fine diamond file or a small sharpening stone. A stable clamp can hold the blade assembly, but never squeeze the cutting edges. Match the existing bevel and move the file away from your fingers. Use light, even strokes, usually five to ten per edge. Avoid electric grinders. They create heat, which can weaken the metal or damage its protective finish. A small brush removes metal dust.

Do not sharpen a cracked, bent, or badly corroded blade. Replace it instead. I would rather lose a little sharpness than change the blade’s balance. Check every edge under bright light. Uneven edges can cause vibration, noisy operation, or jar damage. After cleaning, dry all parts completely and inspect the gasket before reassembly. Test the blender with water first, not food. Stop immediately if it leaks, wobbles, or produces unusual sounds. That cautious test is easy to skip, but it matters.

Why and How to Sharpen Blender Blades at Home? - Tools and Safety Measures for Sharpening Blender Blades

Stage or Dimension Recommended Practice Tools or Materials Safety and Quality Check
Decide whether sharpening is appropriate Sharpen only blades with mild dullness or small edge nicks. Replace the blade assembly if it is cracked, bent, badly corroded, loose, or visibly unbalanced. Bright work light, clean cloth, inspection tray Do not attempt to straighten a bent blade. A damaged or unbalanced blade can create vibration and may damage the jar or motor.
Disconnect the appliance Unplug the blender and remove the jar from the motor base before handling the blade assembly. Dry work surface, non-slip mat Never work on a connected appliance. Keep the motor base away from water and metal filings.
Disassemble carefully Follow the appliance manual to remove the blade unit. Keep the gasket, retaining ring, and other parts in their original order. Correct screwdriver or wrench, small parts container Wear cut-resistant work gloves. Do not grip the cutting edge or force threaded parts.
Clean before sharpening Remove food residue and dry the blade completely. Cleaning makes the bevel and damage easier to inspect. Mild dish detergent, soft brush, clean towel Hold the blade by its hub or blunt sides. Avoid placing fingers near any cutting edge.
Select a sharpening tool Use a fine diamond file or fine sharpening stone that can contact the narrow bevel. A file provides better control than a powered grinder for home use. Fine diamond file or fine sharpening stone, approximately 600–1,000 grit Avoid high-speed grinding because heat can damage the edge and remove too much metal.
Match the original bevel Place the file or stone against the existing angled face of the edge. Do not create a new angle unless the manufacturer’s instructions specify one. Sharpening guide or angle reference, if available Blender blade angles differ by design. Preserving the existing bevel helps maintain cutting geometry and balance.
Sharpen with controlled strokes Use light, consistent strokes in one direction along the bevel. Make a small number of passes on each cutting edge and remove only enough metal to restore a continuous edge. Fine file or stone, stable vise with protective padding Secure the blade without crushing or twisting it. Keep both hands behind the cutting path.
Remove the burr Use a very light finishing pass on the opposite side or a fine deburring stroke, depending on the blade design. Fine stone or fine abrasive pad A burr is a thin raised strip of metal. Remove it gently; excessive filing can thin or weaken the edge.
Inspect balance and condition Compare both blades for similar shape and edge length. Check the hub, fasteners, gasket, and threads for wear. Magnifying glass, clean cloth Stop if the blade is uneven, loose, cracked, or still produces sharp vibration after reassembly.
Reassemble and test Reinstall every part in the correct order and tighten according to the manual. Test first with clean water for a few seconds. Original fasteners, clean water, stable countertop Keep the lid secured and stand clear during the initial test. Stop immediately if there is leakage, unusual noise, or vibration.
Maintain the blade Rinse promptly after use, dry the assembly, avoid hard non-food objects, and inspect the gasket and blade periodically. Soft brush, clean towel, replacement gasket when required Do not use loose ice, bones, metal utensils, or other objects unless the appliance instructions specifically allow them.

Important: Blender blades are often designed as replaceable assemblies rather than kitchen-knife blades. If the blade’s safety, balance, seal, or attachment is uncertain, replacement by a qualified service provider is safer than sharpening.

How to Remove and Inspect Blender Blades Safely

Why and How to Sharpen Blender Blades at Home?

Before sharpening, learn how to remove and inspect the blade safely. Unplug the blender. Empty the jar. Keep it dry. Never trust the switch alone. The U.S. Consumer Product Safety Commission’s NEISS reporting system tracks emergency-department injuries, but it cannot capture every home incident. That gap matters. A small cut may never enter official statistics, yet it can still damage tendons or contaminate food.

Wear cut-resistant gloves, but do not treat them as armor. Hold the blade assembly only by its central hub or plastic housing. Follow the appliance manual before loosening anything. Some assemblies are sealed and should be replaced, not opened. Use a towel for grip, then inspect each edge under bright light. Look for bends, cracks, deep rust, loose rivets, and uneven wear. Spin the shaft gently. Any wobble is a stop sign. Do not guess.

Most blender blades are stamped, thin, and factory-balanced. Aggressive filing can change their angle and create vibration. If the manual permits sharpening, use a fine diamond file and follow the existing bevel with light, equal strokes. Count the strokes on both sides. Remove only a tiny amount of metal. The U.S. Bureau of Labor Statistics lists cuts, lacerations, punctures, and tears as a distinct injury category in its 2023 workplace injury tables; precision is not optional. Rinse removed metal thoroughly, dry every part, and check the gasket before reassembly. Test with water first. If the jar leaks, the blade rattles, or the motor smells hot, stop and replace the assembly.

Step-by-Step Methods for Sharpening Blender Blades at Home

Sharpening blender blades at home can restore cutting performance, but it requires patience and careful handling. Unplug the blender completely, remove the jar, and separate the blade assembly only if the manual allows it. Wear cut-resistant gloves, then wash away dried food with warm water. Dry every part before inspection.

Place the blade on a stable towel. Check for chips, deep rust, bent edges, or a loose hub. Replace badly damaged blades instead of sharpening them. For a dull but straight edge, use a fine sharpening stone or small diamond file. Hold the tool against the original bevel, usually around 15 to 20 degrees. Push it across the edge in one direction, using light pressure. Count the strokes on each side.

Keep the angle steady. That is the difficult part. After five strokes, inspect the edge under bright light. A small, even burr may appear along the opposite side. Remove it with two gentle finishing strokes. Do not grind aggressively, because excess metal removal can upset the blade’s balance. I once used too much pressure and created a rough spot that reduced smooth rotation. Clean the blade thoroughly, reassemble it securely, and test the blender with water before adding food. Stop immediately if you hear wobbling, scraping, or unusual vibration.

How to Reassemble, Test, and Maintain Sharpened Blades

Reassembling sharpened blender blades requires patience and a clean workspace.

Unplug the appliance before handling any part. Check the blade shaft, sealing ring, washer, and locking base for damage. Replace cracked or flattened seals.

A sharp edge cannot compensate for a loose assembly.

I place each component in the same order recorded before removal. The blade usually sits beneath the jar, while the seal prevents leaks around the shaft.

Tighten the base firmly, but avoid forcing it with excessive pressure. I once overtightened a base and distorted the seal.

It looked secure, yet water slowly escaped during testing. That mistake changed how carefully I inspect the underside.

Fill the jar halfway with clean water, secure the lid, and run the blender briefly at its lowest setting.

Keep your hands away from the moving assembly. Stop immediately if you hear scraping, see wobbling, or notice leakage.

A smooth sound and steady motion suggest proper alignment, but they do not prove perfect sharpening.

Examine the blade afterward for uneven edges or fresh nicks. Wash removable parts promptly, dry them completely, and store the jar with the lid slightly open.

Avoid abrasive tools that can damage the seal or dull the cutting edge. Check the assembly before every use, especially after repeated washing.

Small movements matter.

FAQS

How should I prepare before sharpening blender blades?

Unplug the blender completely. Remove the jar and empty it. Never rely on the switch alone. Wear cut-resistant gloves, safety glasses, and closed shoes. Place a thick towel underneath to prevent sliding.

Can every blender blade assembly be removed safely?

No. Check the appliance manual before loosening anything. Some assemblies are sealed and should be replaced. Never force a stuck assembly. That shortcut can create a dangerous failure.

How can I inspect a blade before sharpening?

Use bright light and examine every edge carefully. Look for cracks, bends, deep rust, loose rivets, or uneven wear. Hold the assembly by its central hub or housing. Gently check the shaft for wobbling. Any wobble is a stop sign.

Which tools are suitable for sharpening blender blades?

Use a fine diamond file or a small sharpening stone. A stable clamp may hold the assembly. Never squeeze the cutting edges. Avoid electric grinders. Heat can weaken metal and damage its finish.

What sharpening technique is safest for a straight, dull edge?

Follow the existing bevel, usually near 15 to 20 degrees. Use light, even strokes away from your fingers. Try five to ten strokes per edge. Count both sides carefully. Remove very little metal.

How can I prevent the blade from becoming unbalanced?

Keep the angle steady throughout the process. Use equal strokes on matching edges. Inspect the blade after every few strokes. Aggressive filing can cause vibration and noisy operation. I once pressed too hard. The rotation became rough.

When should I replace the blade instead of sharpening it?

Replace blades with cracks, bends, deep corrosion, or loose hubs. Do not sharpen damaged metal into a false repair. A slightly dull blade is safer than an unstable one. Balance matters more than extreme sharpness.

How should I clean and test the blade after sharpening?

Brush away metal dust, then rinse the parts thoroughly. Dry every component completely. Inspect the gasket before reassembly. Secure the assembly firmly. Test the blender with water, not food. Stop if it leaks, wobbles, scrapes, rattles, or smells hot.

Conclusion

Blender blades can become dull over time because of frequent use, hard ingredients, residue buildup, or accidental contact with unsuitable objects. This guide explains how to sharpen blender blades at home while emphasizing safety and careful inspection. Before beginning, unplug the appliance, prepare protective gloves, a stable work surface, and appropriate sharpening tools. Remove the blade assembly according to the blender’s design, inspect it for bends, cracks, rust, or other damage, and replace it instead of sharpening it if its condition is unsafe.

The article presents practical sharpening methods, such as using a sharpening stone or fine file with controlled, consistent strokes along the existing cutting edge. It also explains how to avoid over-sharpening, clean the components, and check that the blades move freely without wobbling. After reassembly, test the blender briefly with care, watching for unusual noise or vibration. Regular cleaning, proper ingredient preparation, and safe storage can help maintain sharp, effective blades. Following these steps makes How to sharpen blender blades at home a manageable maintenance task.

Oliver

Oliver

Oliver is a seasoned marketing professional with a wealth of expertise in driving brand awareness and engagement. With a deep understanding of our company's product offerings, he consistently delivers high-quality content that enriches our professional blog. His insights not only shed light on......